
Dusting might seem like a simple, routine chore, but the way you do it can make a big difference, especially when it comes to protecting the finish on your furniture. Many people don’t realize that using the wrong tools or techniques can lead to scratches, dull spots, or even long-term damage. Whether you’re caring for vintage wood, high-gloss lacquer, or modern laminate surfaces, taking a gentle and thoughtful approach is key.
Key Takeaways:
- The best way to dust furniture is to use a microfiber cloth and work from top to bottom to prevent dust from resettling on cleaned areas.
- Different finishes need different care, so find out what kind you have to avoid mistakes that could ruin it.
- Dust once a week to stop buildup, and take extra steps like keeping dust out and using safe furniture oils now and then.
In this article, we’ll cover the best way to dust furniture without damaging the finish, offering practical tips and product recommendations to help you keep your pieces looking their best for years to come.
Why Dusting the Wrong Way Can Damage Wood Finishes
Dust might seem like a minor annoyance, but the way you remove it can have a major impact on your furniture’s finish. That’s because dust isn’t just light and fluffy—it contains tiny abrasive particles. When wiped with the wrong cloth or technique, these particles can scratch the surface like sandpaper. Over time, even small scratches add up, dulling the shine and damaging the protective layer. Tools like feather dusters often just spread dust around, and many commercial sprays can leave behind residues that either attract more dust or chemically react with the finish, making things worse.
The reason this matters is that different wood finishes respond differently to cleaning methods. A one-size-fits-all approach simply doesn’t work. What protects a sealed, glossy piece could easily harm a more delicate, oil-finished surface. If you’re using the wrong technique for your specific furniture, you could unintentionally shorten its lifespan or ruin its appearance. Understanding why dusting correctly is important and how various finishes behave is the first step to preserving your furniture’s beauty and value.
If you’re unsure, check out our quick-reference table that explains how different wood finishes respond to dust.

Best Tools and Materials for Dusting Furniture
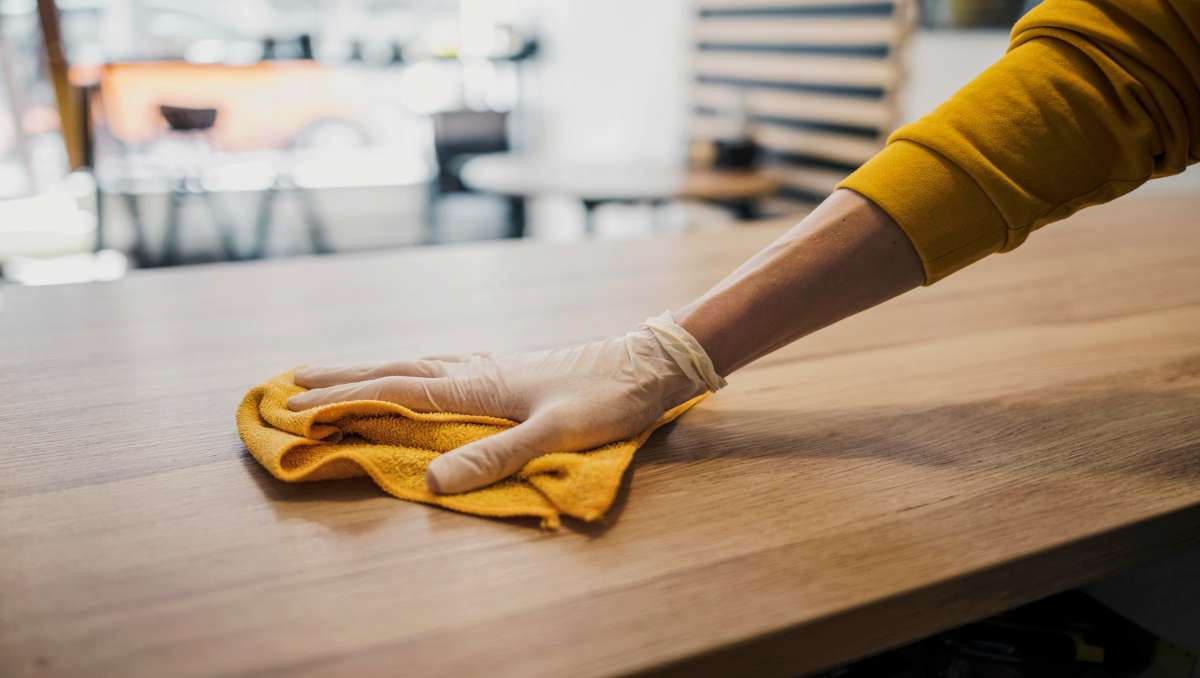
The right tools make all the difference when it comes to dusting without damage. A high-quality microfiber cloth is your best bet; it traps dust instead of pushing it around and won’t scratch delicate surfaces. For detailed or carved areas, use a soft-bristle brush (like a clean paintbrush or makeup brush) to gently lift dust from crevices. Avoid dry rags, feather dusters, and anything abrasive.
As Claire Tamburro, ASID, LEED AP, ID + C, from Tamburro Interiors recommends:
“The best way to dust furniture is to use a soft cloth such as cotton (an old t-shirt with no stiff printing on it would do fine) or a microfiber one. Dust with the grain to help preserve the finish.”

The Best Way to Dust Furniture: Step-by-Step Instructions
To dust furniture effectively without damaging the finish, it’s all about technique and the tools you use. A soft, clean microfiber cloth is your go-to, and always follow the wood grain rather than wiping in circles. Weekly dusting is ideal to prevent buildup that can become abrasive over time. Skip the harsh sprays and over-wetting, and only use wood-safe cleaners or polishes when truly needed.
Below is a simple, safe method that works on most types of wood furniture.

Step 1: Assess Before You Dust and Prep the Area
Before you start, take a moment to evaluate the piece of furniture. Is the surface sticky, extremely dusty, or just lightly coated? This determines whether you need a dry wipe or a damp one later on. Open windows to reduce airborne dust during cleaning. Clear the area of decor or clutter to avoid knocking things over as you clean.
Step 2: Use a Dry Microfiber Cloth From Top to Bottom
Begin dusting with a dry microfiber cloth, starting from the highest surfaces and working your way down. This way, any dust that falls as you clean will be caught as you go. Move gently along the grain of the wood; never against it. This reduces the risk of micro-scratches and keeps the finish looking consistent. Don’t press too hard; let the cloth do the work. Claire suggests:
“For stubborn dust, slightly dampen either a cotton cloth or a microfiber one to lift away even more dust and capture it easily. Avoid using anything scratchy such as paper towels which can damage the finish.”
Step 3: Lightly Damp Wipe (Only If Needed)
If the surface has grime, smudges, or residue that a dry cloth can’t remove, slightly dampen the microfiber cloth with water or a wood-safe cleaner. Wring it out thoroughly to ensure it’s just barely damp. Wipe gently in the direction of the grain, then immediately follow with a dry cloth. Never spray water or cleaner directly onto the furniture as it can seep into cracks or edges.

Step 4: Use a Vacuum for Intricate Areas
For carved details, crevices, or areas that are hard to reach with a cloth, use a vacuum with a soft brush attachment. Make sure the bristles are clean and not stiff to avoid scratching. This is especially helpful for ornate furniture or anything with grooves where dust tends to settle unnoticed. A small handheld vacuum or the brush setting on a larger vacuum will do the job.
Step 5: Dry Everything Immediately
Even a light damp wipe can leave behind moisture. Once you’re done, use a dry microfiber cloth to go over every surface again. This ensures no lingering moisture seeps into the wood and helps buff the finish to a soft, clean sheen. Don’t skip this final pass; it’s quick but makes a noticeable difference in preserving the furniture’s look.
Special Surfaces Need Extra Care
Some furniture finishes like matte or raw wood are super sensitive—they don’t like moisture or leftover residue. On the other hand, high-gloss or polyurethane finishes are tougher but can still get streaks or tiny scratches if you’re not careful with your cloth or cleaner. Knowing what finish you’ve got helps you avoid damage and keeps your furniture looking great longer.
Plus, some wood might be treated with natural oil, wax, or shellac, and each one reacts differently to dusting. If you’re not sure, stick to the safest option: a dry microfiber cloth and vacuum for the tricky spots. As Claire puts it:
“Feather dusters… can cause scratches. Don’t use wet cloths—they can swell the wood and ruin the finish. Dusting products with silicone causes buildup and makes the dust stick more. Plus, they can cloud the finish if used too often or if the wood gets soaked.”

Bring timeless comfort and classic design into your home with a genuine Amish glider or rocker. Discover our hand-crafted collection and find the perfect piece to your favorite cozy corner.
How to Keep Your Furniture Dust-Free Longer
Keep windows closed during high-pollen or windy days to reduce airborne particles settling on surfaces, and use air purifiers or HVAC filters to minimize dust indoors. Furniture placed near vents, radiators, or in direct sunlight tends to gather more dust and experience faster finish deterioration due to heat and UV exposure.
To further protect your wood, use furniture oils or polishes designed for your furniture finish—but avoid overuse, as most wood doesn’t require frequent polishing. For high-use surfaces like dining or coffee tables, adding soft placemats or runners helps prevent micro-scratches between cleanings. These simple steps, as Claire points out, go a long way toward maintaining the beauty and durability of your wood furniture.
“To maintain a wood product, beeswax polish or lemon oil will nourish the wood and retain its luster. Not all wood finishes such as shellac, lacquer, or oil-rubbed are compatible with polishes or cleaners. Consult with the furniture manufacturer/ designer and read labels for the best results.”
💡 Pro Tip
After dusting, lightly spray the air near your furniture with a mix of water and a little rubbing alcohol. This helps stop static electricity, so dust won’t stick to your wood as quickly and keeps it cleaner longer.
Conclusion: Keep Furniture Dust-Free the Smart Way
The best way to dust furniture is all about using the right tools and techniques to protect your pieces while keeping them clean. With a little know-how and the proper approach, dusting becomes more than just a chore—it’s a simple way to care for your furniture for the long haul. Spending a few minutes each week dusting the right way helps preserve the beauty and finish of everything from heirloom antiques to your favorite modern pieces.
Frequently Asked Questions
What is the safest way to dust delicate antique furniture finishes?
Use a dry, soft microfiber or cotton cloth with minimal pressure. Avoid any sprays or damp cloths unless advised by a restoration expert, especially for shellac or French-polished surfaces.
How often should I dust different types of furniture to avoid finish damage?
Weekly dusting is ideal for most furniture. For rarely used rooms, bi-weekly is fine. In high-traffic areas or homes with pets, more frequent dusting (2–3 times a week) may be necessary.
Is it better to dust before or after vacuuming to protect finishes and indoor air quality?
Dust before vacuuming. Dusting first allows loose particles to fall to the floor, which your vacuum can then pick up, reducing overall dust and helping maintain air quality.
Can I use a Pledge spray to dust my furniture?
Use with caution. Some commercial sprays like Pledge can leave a waxy residue or buildup over time. If your furniture has a sealed finish, it may be safe in moderation. Always test on a small, hidden area first.